
This gluten-free sourdough bread is an overnight, artisan-style loaf made with a simple gluten-free 1:1 flour blend and a naturally fermented gluten-free sourdough starter. The method is designed specifically for gluten-free dough, using a slow, controlled rise and a long cold proof to build structure and flavor without complicated flour blends or extra additives.

A Quick Look at the Recipe
✅ Recipe Name: Gluten-Free Sourdough Bread
🕒 Ready In: ~21-28 hours (includes rise, overnight cold proof, baking, and cooling)
👪 Serves: 1 artisan loaf (8-10 slices)
🍽 Calories: ~161 calories per slice
🥣 Main Ingredients: Gluten-free 1:1 flour blend, unfed gluten-free sourdough starter, room-temperature water, fine sea salt
📖 Dietary Info: Gluten-free, dairy-free, vegetarian, no refined sugar
👌 Difficulty: Easy-Moderate (beginner-friendly gluten-free sourdough with clear visual cues and a simple, reliable method)
SUMMARIZE & SAVE THIS CONTENT ON
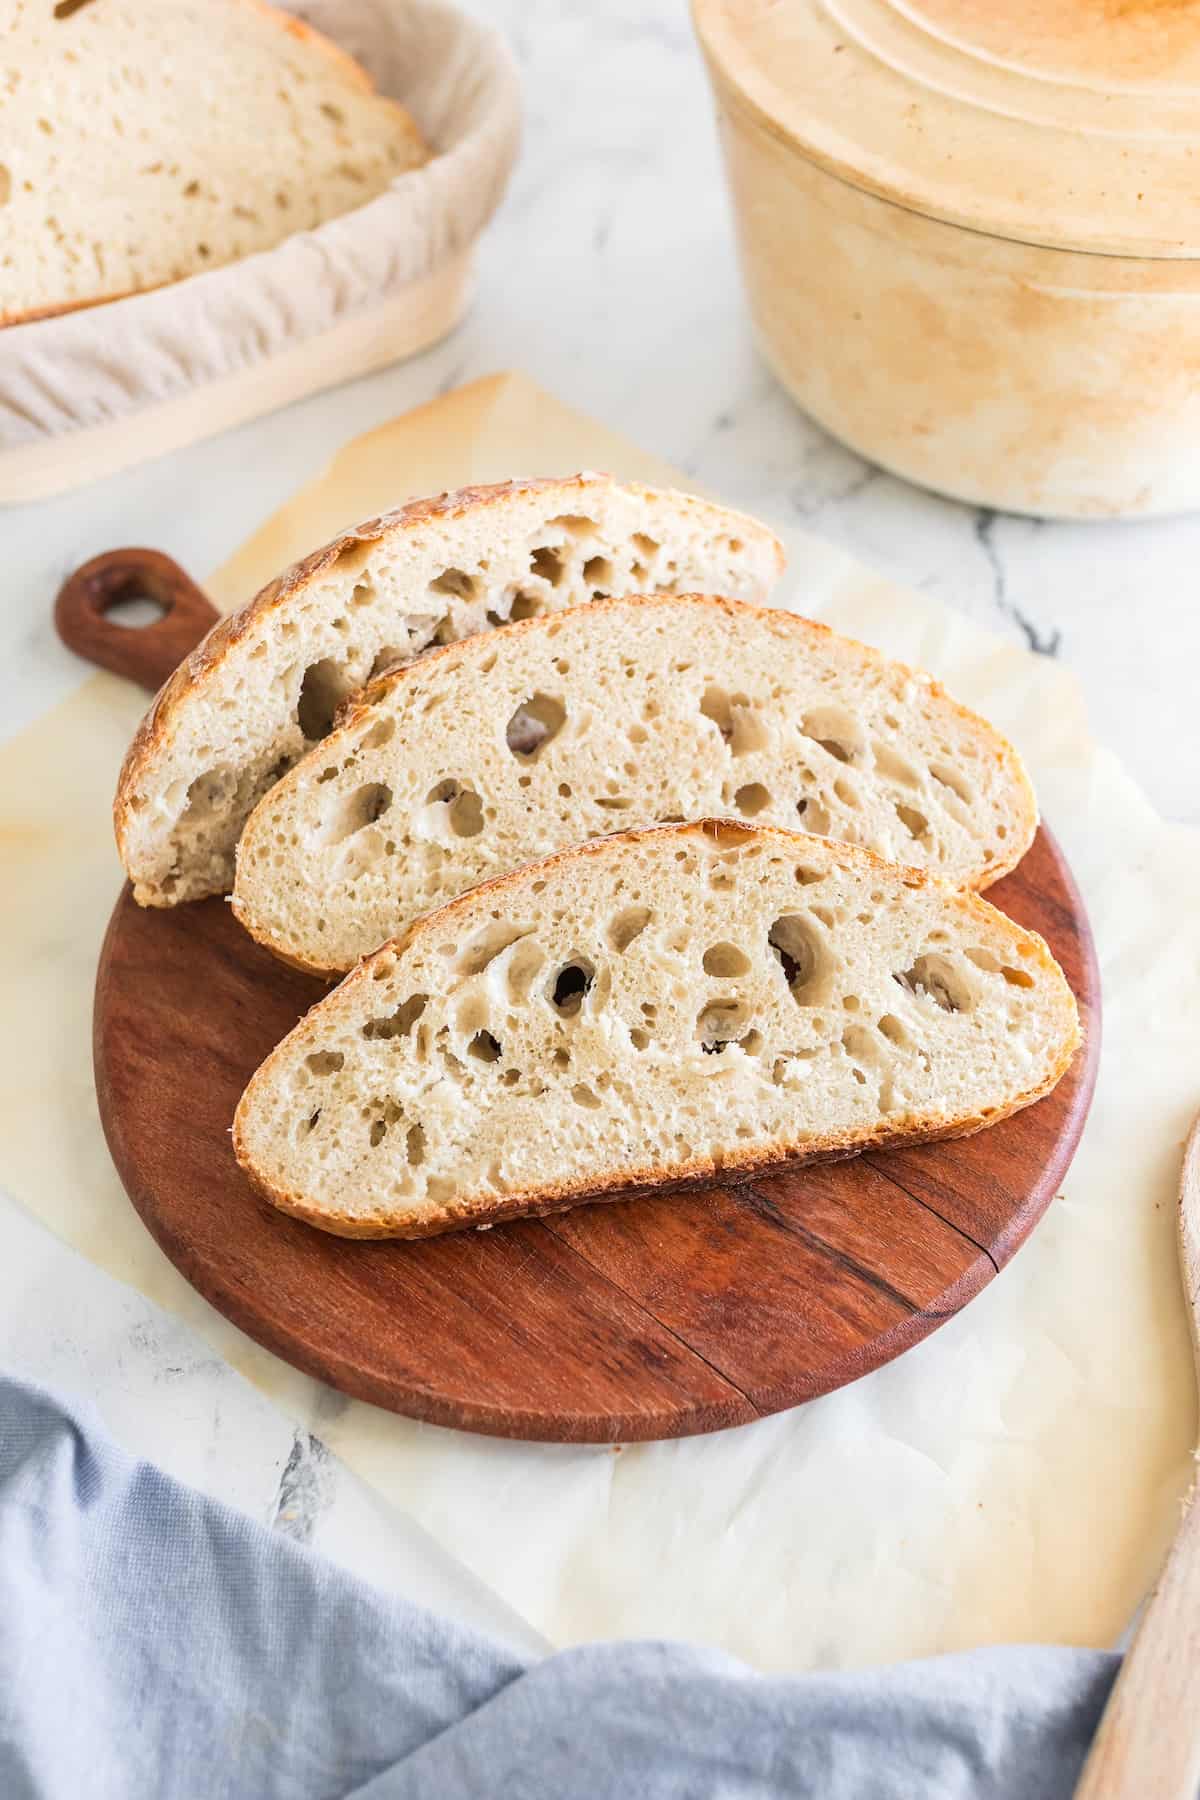
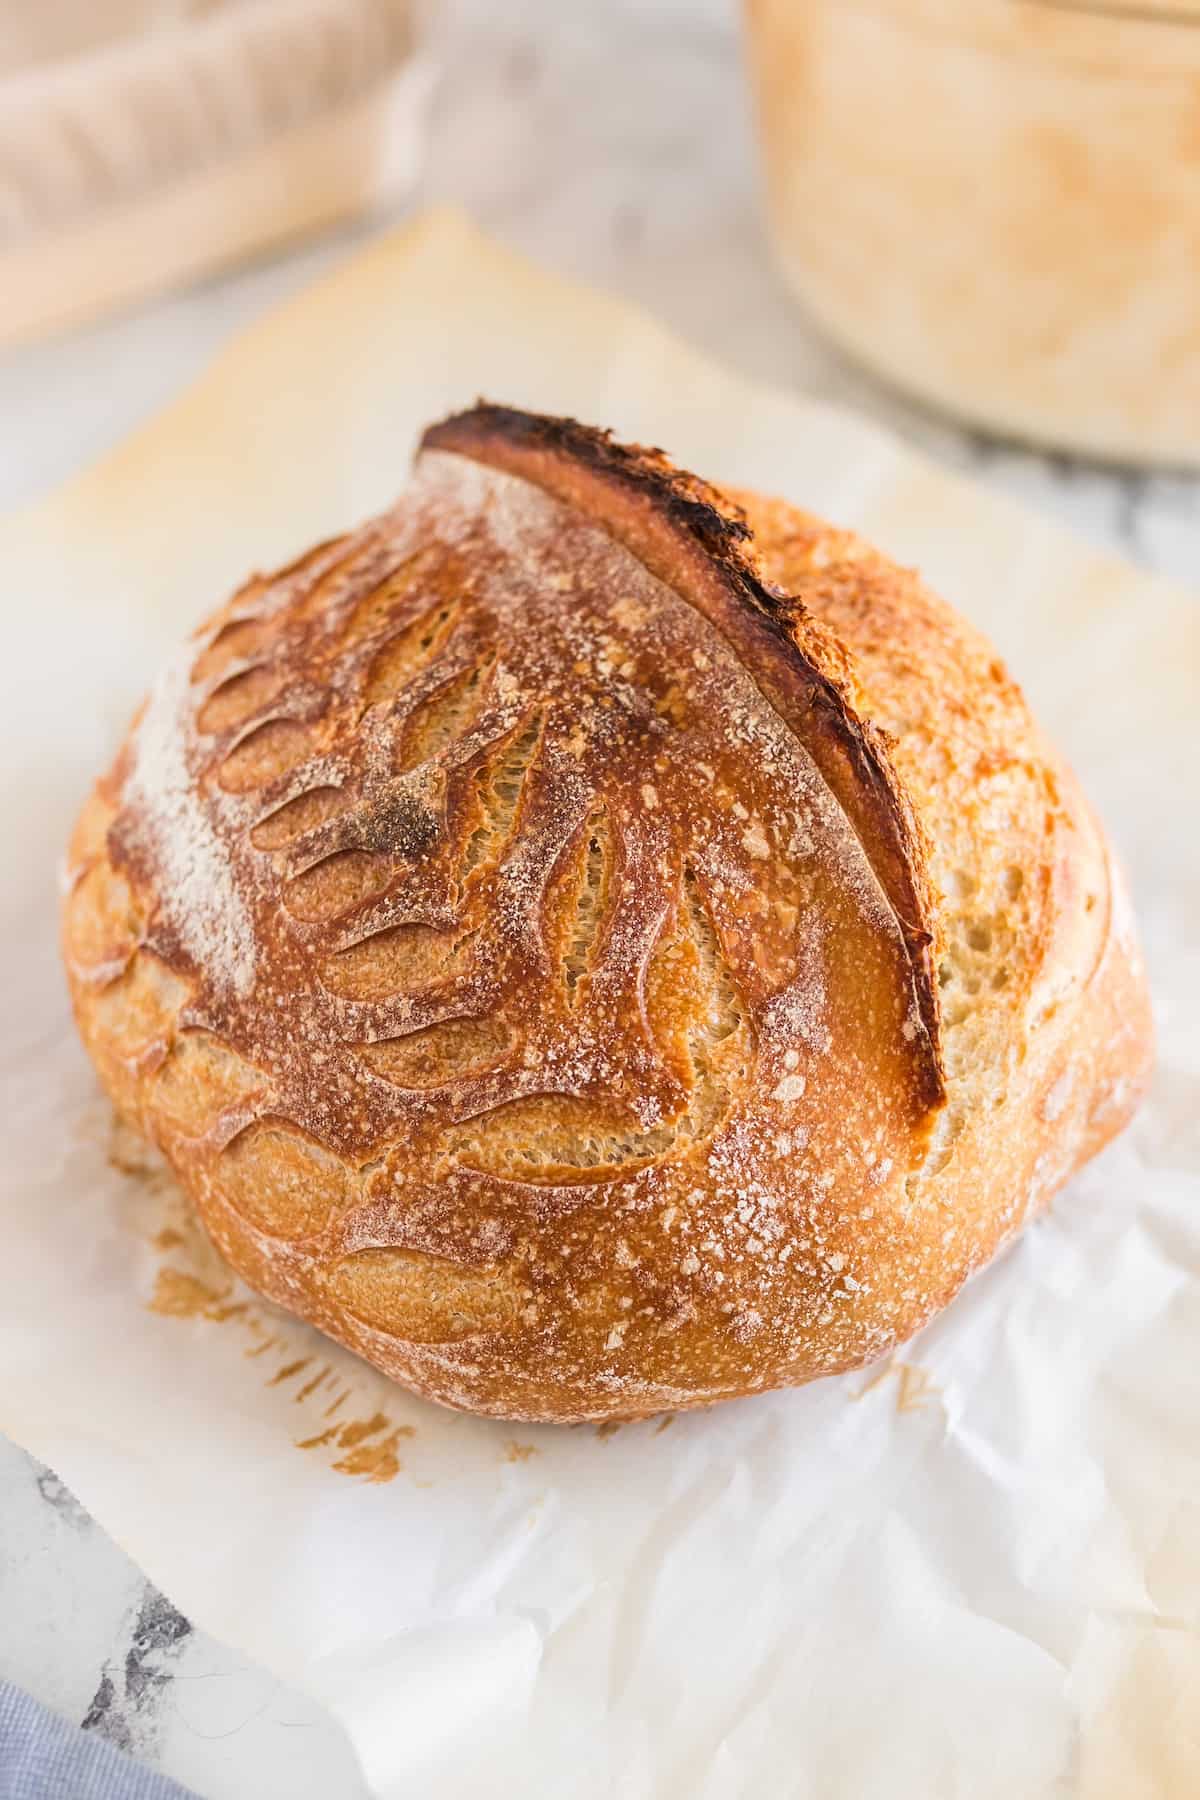
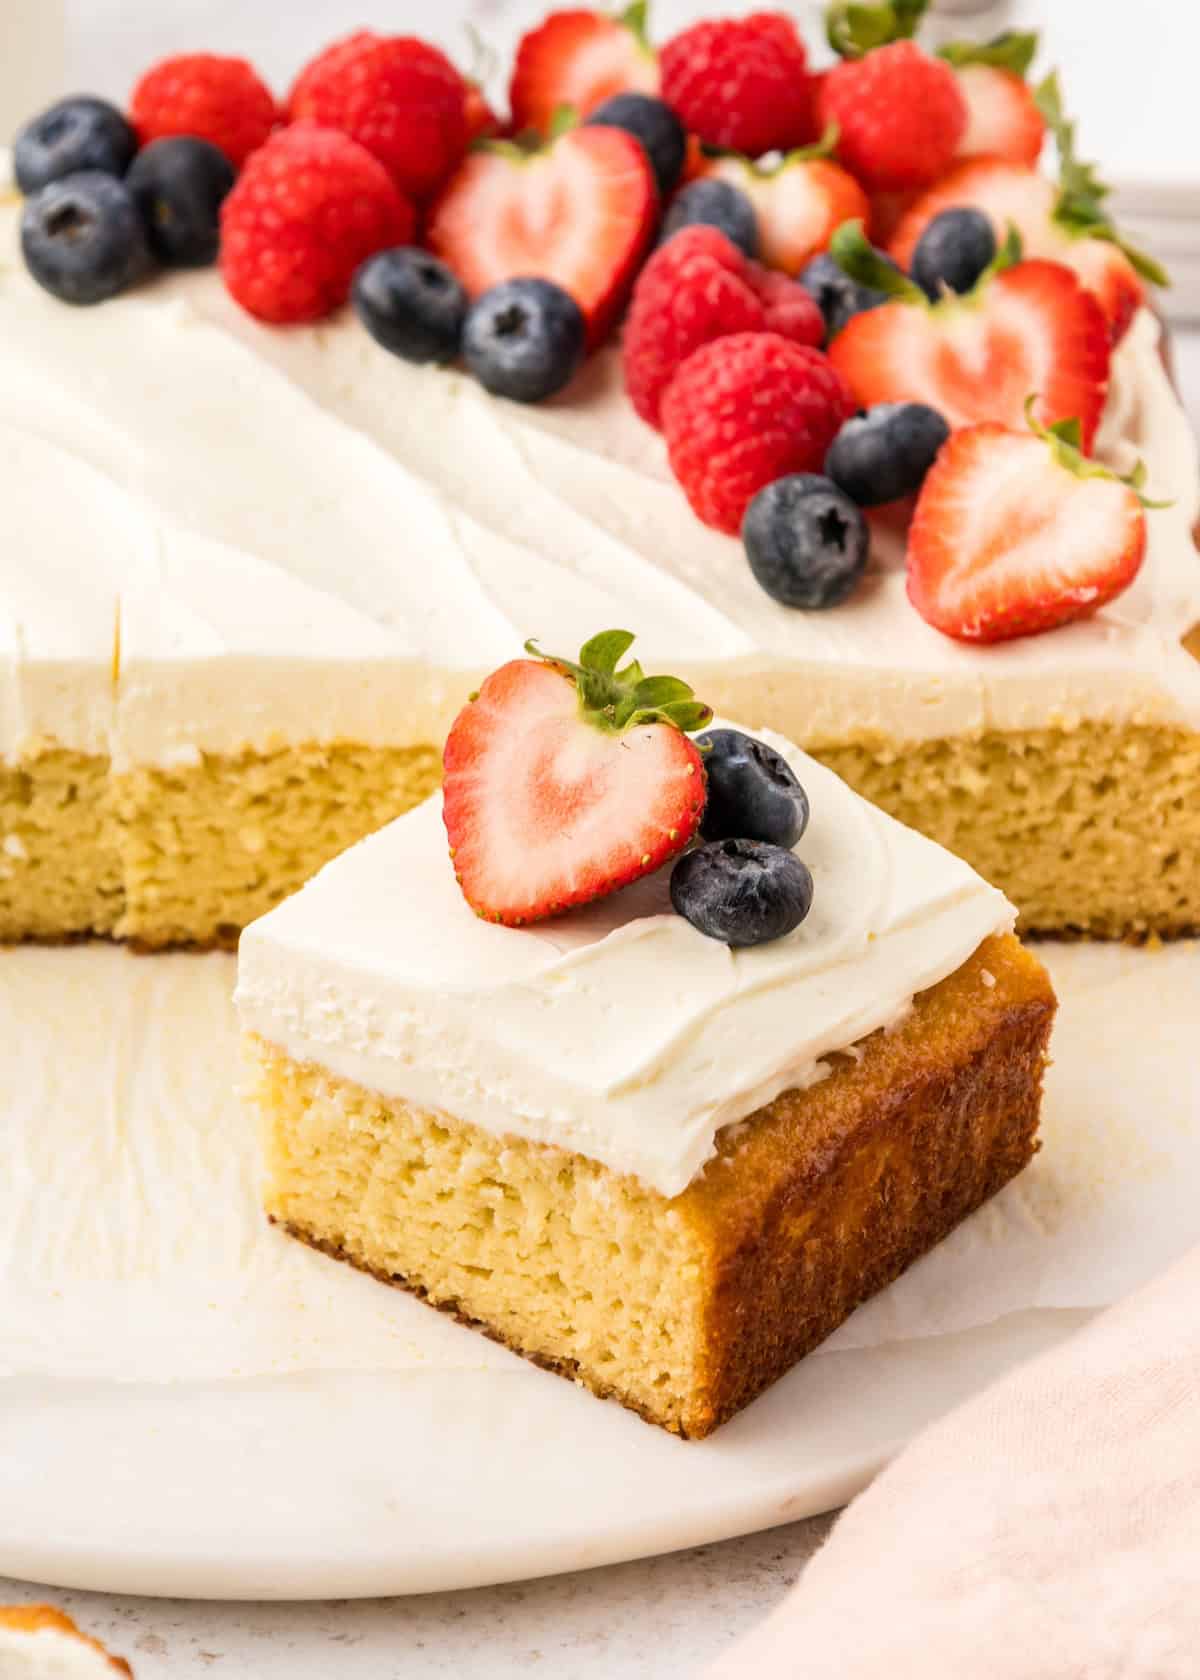
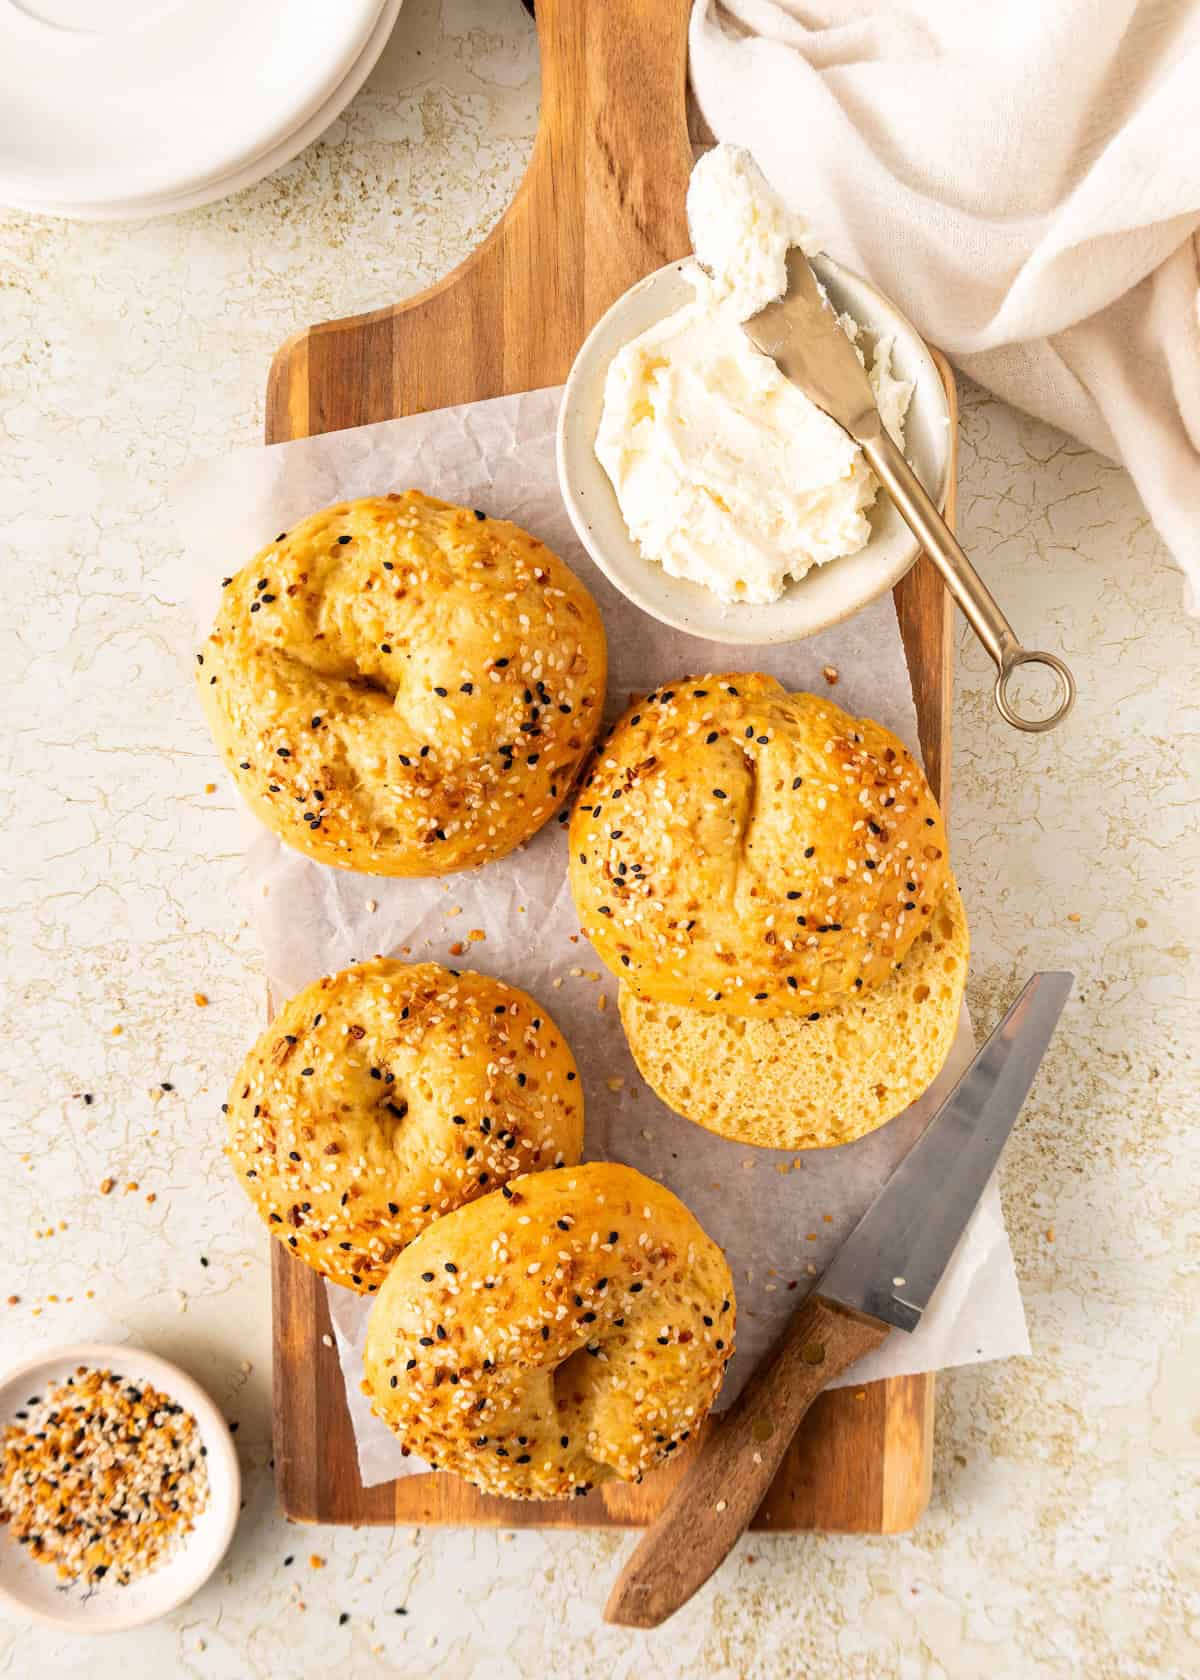
Baked in a Dutch oven, this gluten-free bread develops a crisp, golden crust and a tender interior that slices cleanly and toasts well. Clear visual cues guide each step, making this sourdough bread reliable for both first-time and experienced gluten-free bakers.
If you're diving into gluten-free sourdough, don't miss my Sourdough Discard Flatbread for using up any extra starter. I also love serving Tzatziki Chicken Salad piled right on top of a fresh slice of this bread, and pairing it with a bowl of Butternut Squash Soup for the coziest, most satisfying meal.
Jump to:
- A Quick Look at the Recipe
- Why You'll Love Gluten-Free Sourdough Bread:
- Key Ingredients:
- Easy Substitutions & Variations:
- How to Make Gluten-Free Sourdough Bread:
- Recipe Notes & Tips:
- How to Store:
- Gluten-Free Sourdough Bread FAQs:
- More Gluten-Free Recipes You'll Love
- Get a FREE Healthy Meal Planning Ebook
- Gluten-Free Sourdough Bread
⭐️⭐️⭐️⭐️⭐️
This bread is rustic and cozy with a satisfying flavor. If the recipe is followed carefully it turns out fabulous!
- Leah
Why You'll Love Gluten-Free Sourdough Bread:
Reliable Results: This recipe is built around a slow, controlled fermentation and clear visual cues, making it more consistent than many gluten-free sourdough methods.
Artisan-Style Loaf: Baked in a Dutch oven, the bread develops a crisp, golden crust with a tender interior that slices cleanly and toasts beautifully.
Simple, Purposeful Method: No complicated flour blends, stretch-and-folds, or extra additives, just a streamlined process designed specifically for gluten-free dough.
Beginner-Friendly Sourdough: The overnight cold proof and step-by-step guidance help remove guesswork, even if this is your first time baking gluten-free sourdough bread.
Key Ingredients:
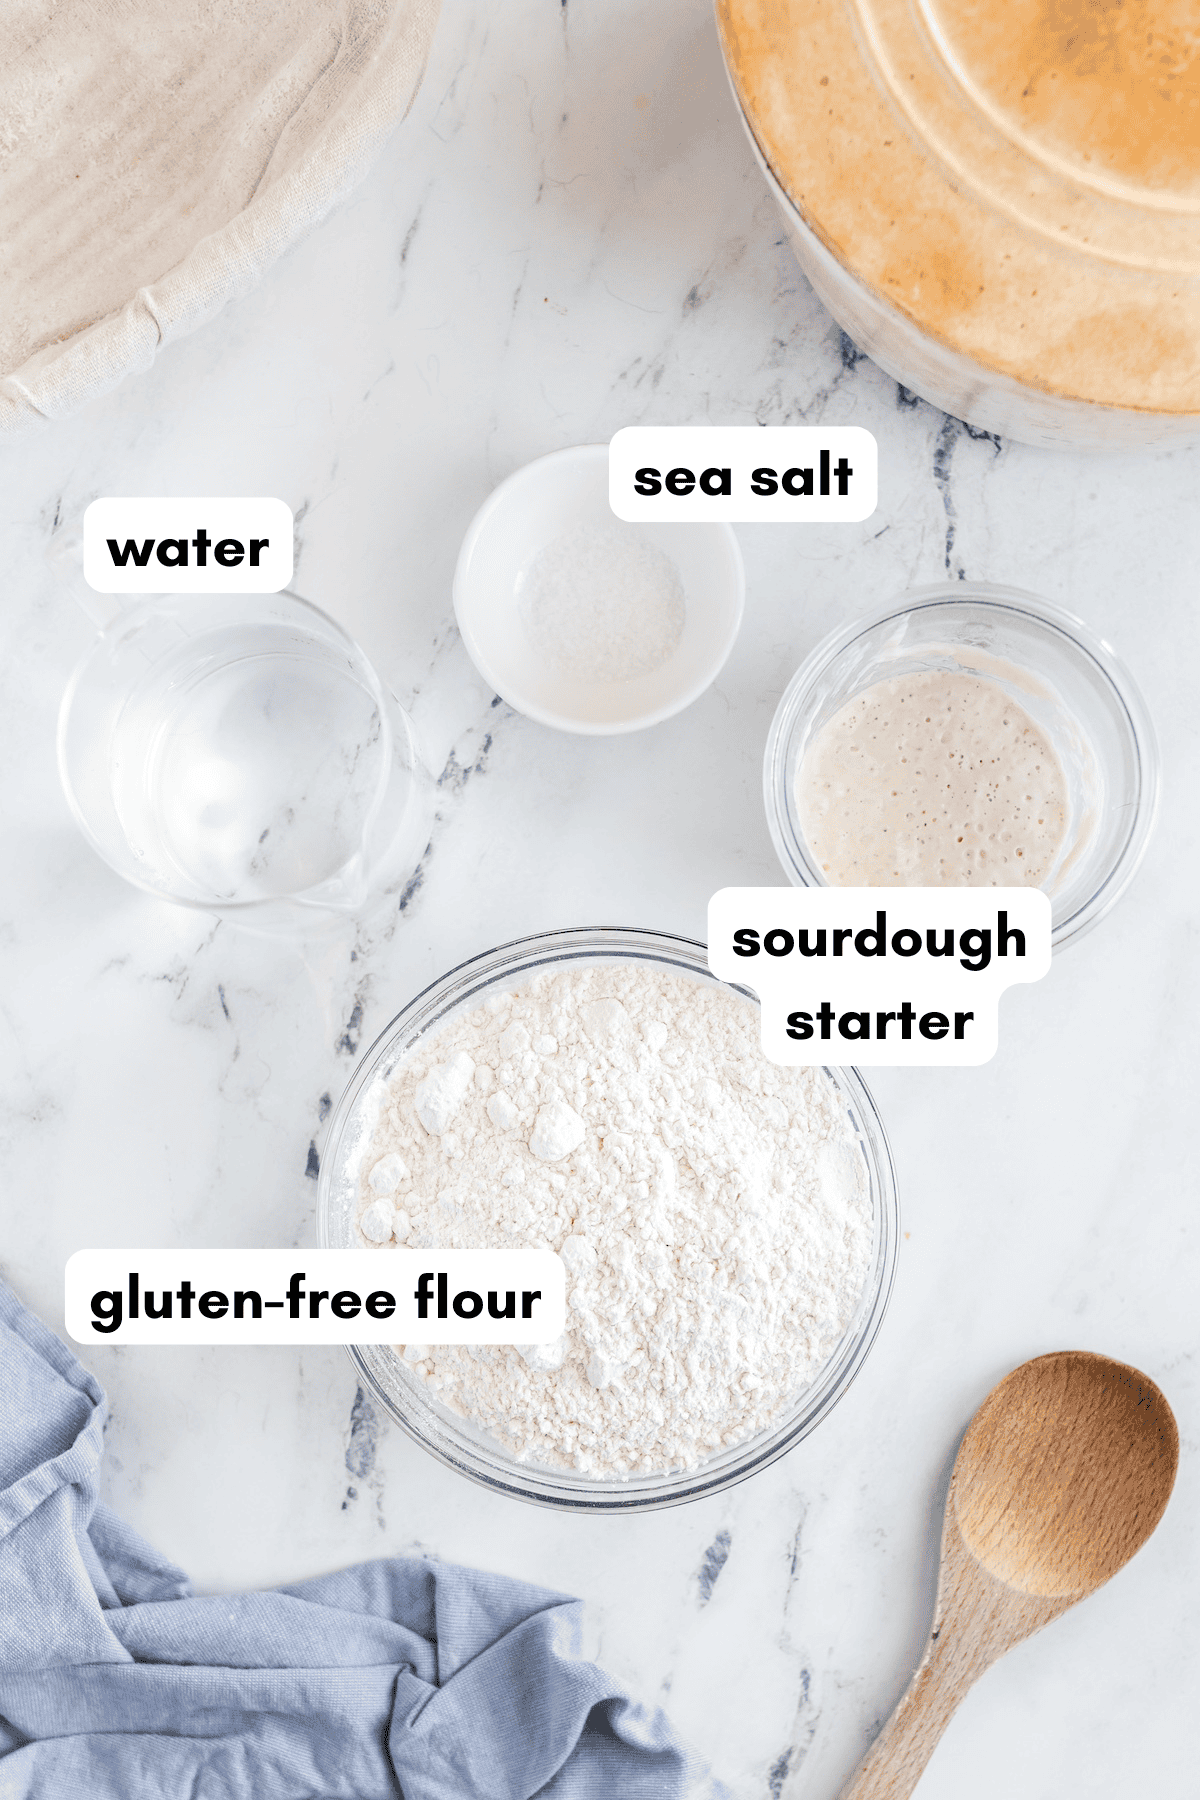
- gluten-free flour. Use a gluten-free 1:1 flour blend that already contains xanthan gum. These blends are formulated to provide structure similar to wheat flour, making them ideal for gluten-free sourdough bread without requiring a custom flour mix.
- room temperature water. Water should be at room temperature, ideally between 68-72°F. Cooler water helps slow fermentation, giving gluten-free dough more stability and reducing the risk of over-proofing.
- unfed gluten-free sourdough starter. This recipe uses unfed starter that is bubbly, has reached its peak, and is just beginning to fall. Using unfed starter promotes a slower, more controlled fermentation, which leads to better structure and more consistent results in gluten-free sourdough bread.
Scroll to the recipe card at the bottom of this page for exact quantities.
Easy Substitutions & Variations:
- Flour Blends: This recipe works best with gluten-free 1:1 flour blends that already contain xanthan gum. Different blends absorb water differently, so you may need to adjust the water by 10-20 grams. The dough should be thick, sticky, and hold its shape, not runny or pourable.
- No Xanthan Gum in Your Blend: If your flour blend does not contain xanthan gum, whisk 15 grams whole psyllium husk into the water and let it gel for about 5 minutes before mixing. This provides the structure needed for gluten-free sourdough bread.
- Starter Flour Types: Gluten-free sourdough starters fed with brown rice flour, sorghum flour, or a gluten-free 1:1 blend all work well. The key is using a 100% hydration starter that is bubbly, unfed, and just past its peak.
- Flavor Add-Ins: For variation, gently fold in up to ½ cup of seeds, fresh herbs, or shredded cheese just before shaping. Avoid add-ins with excess moisture, which can affect structure.
- No Dutch Oven: If you don't have a Dutch oven, bake the bread on a parchment-lined sheet pan and place a metal pan of hot water on the bottom rack of the oven to create steam. The crust will be slightly softer, but the loaf will still bake through properly.
How to Make Gluten-Free Sourdough Bread:
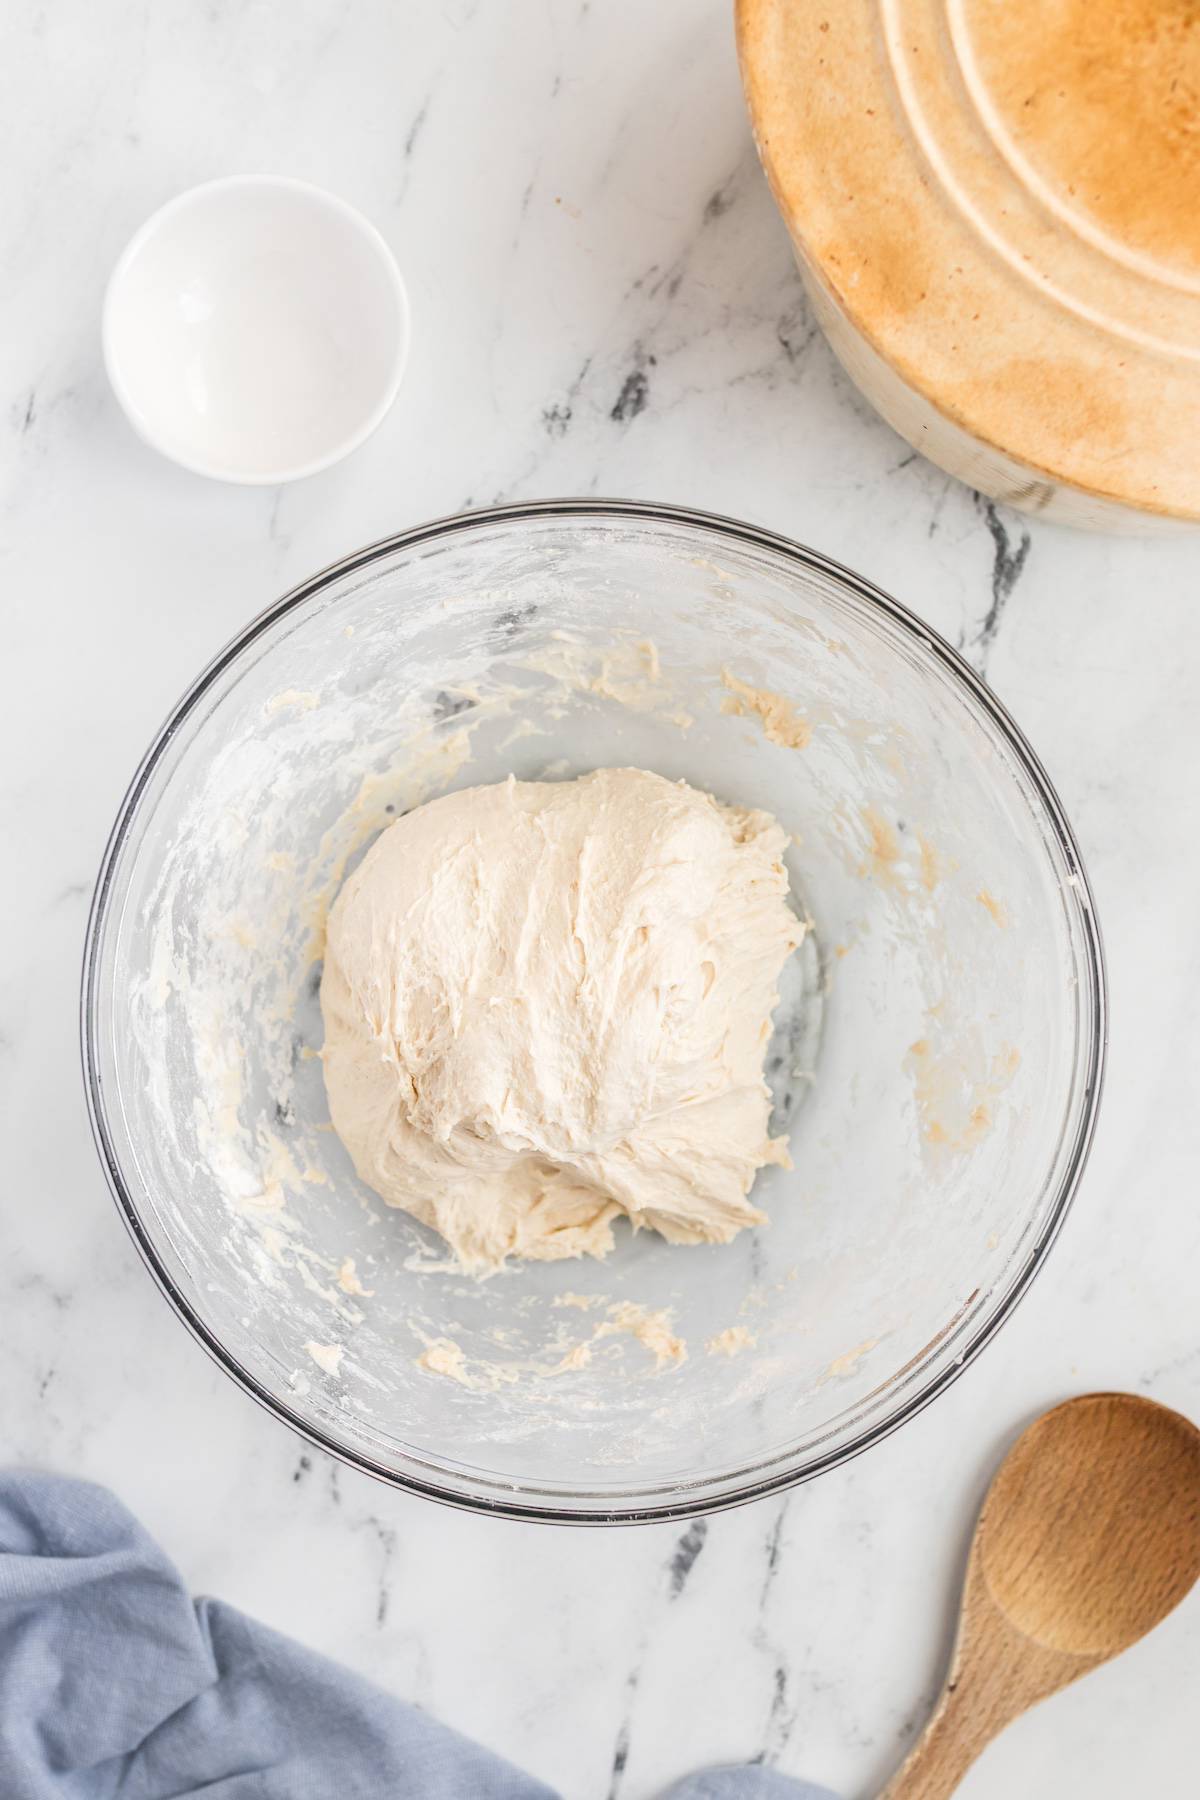
- Step 1: Mix the gluten-free flour, salt, unfed sourdough starter, and room-temperature water until fully combined and no dry flour remains. The dough will be thick, sticky, and uneven. Cover and let rest.
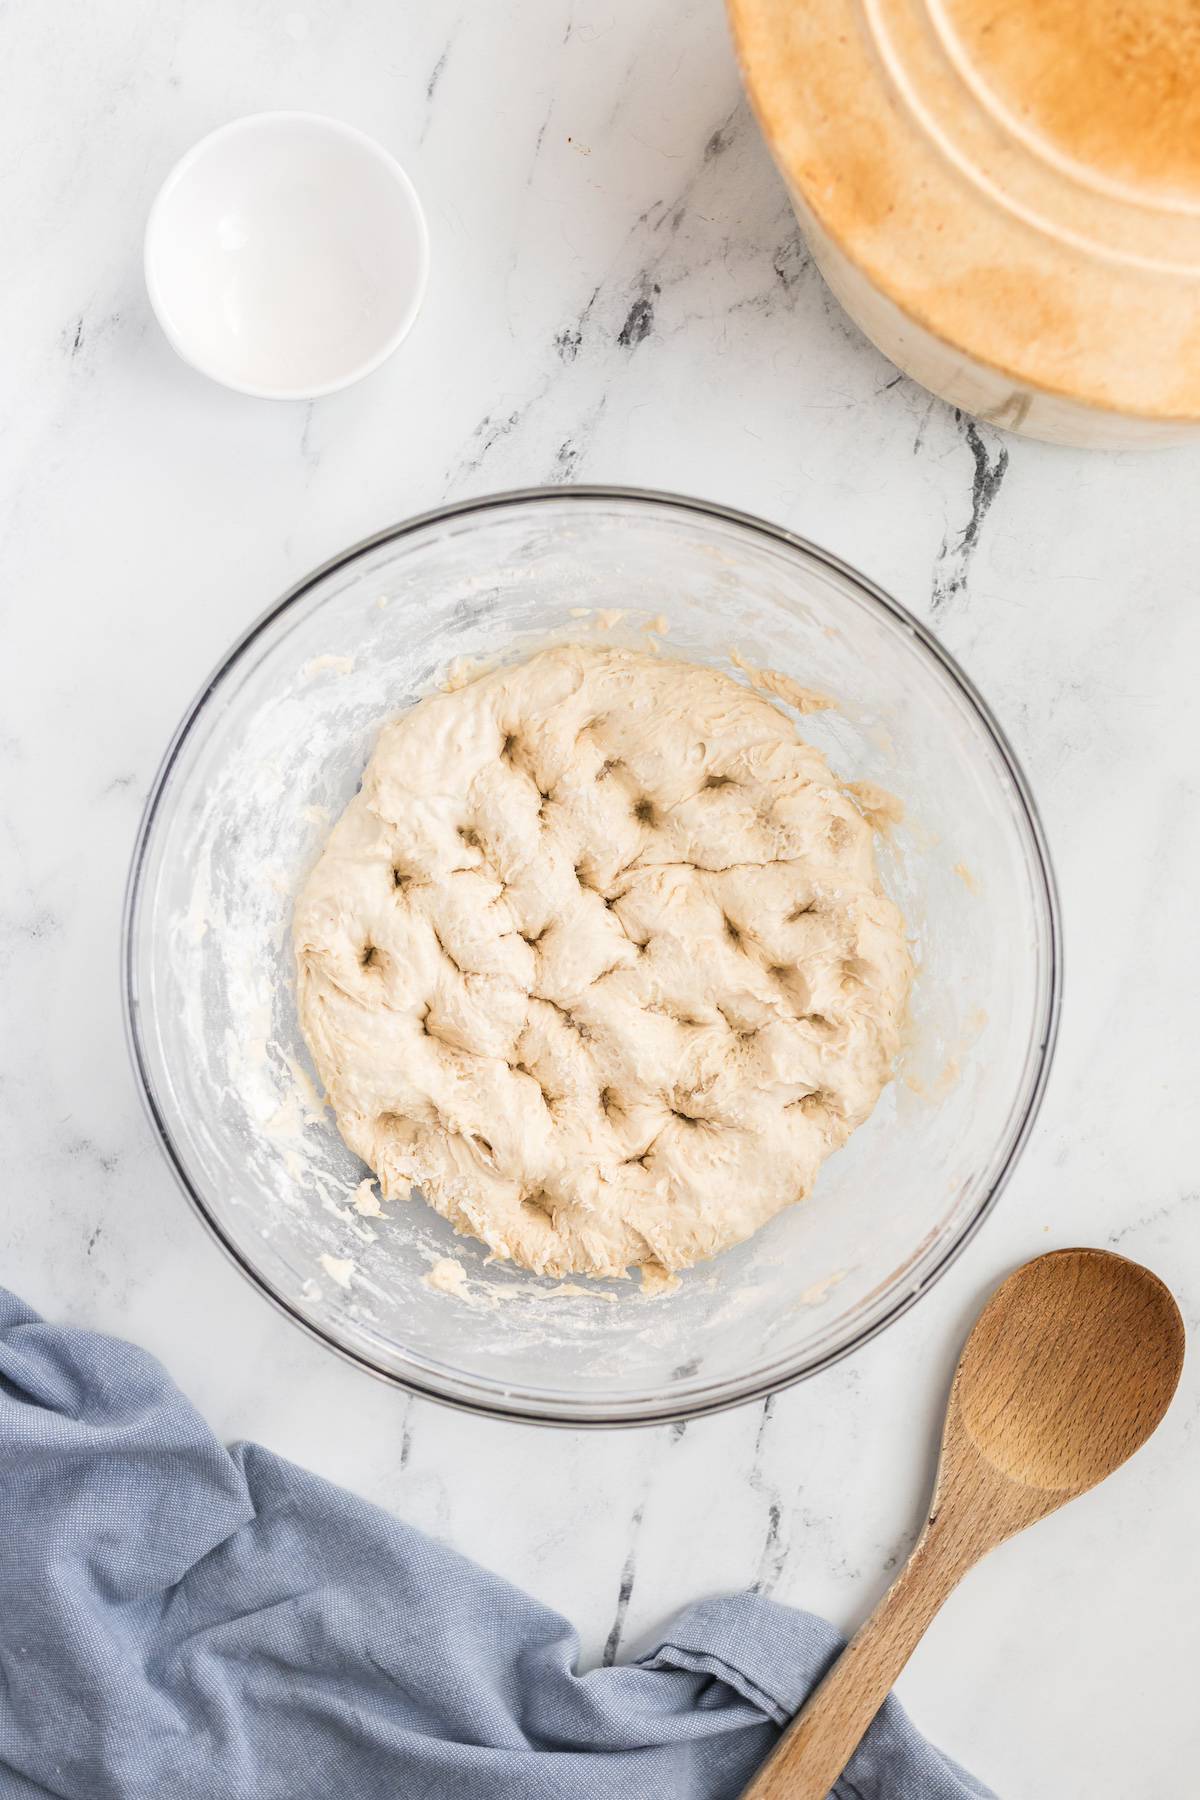
- Step 2: Let the dough rise at room temperature until puffy and airy, about 6-9 hours. The dough should increase by roughly 50-75% and show small bubbles beneath the surface.
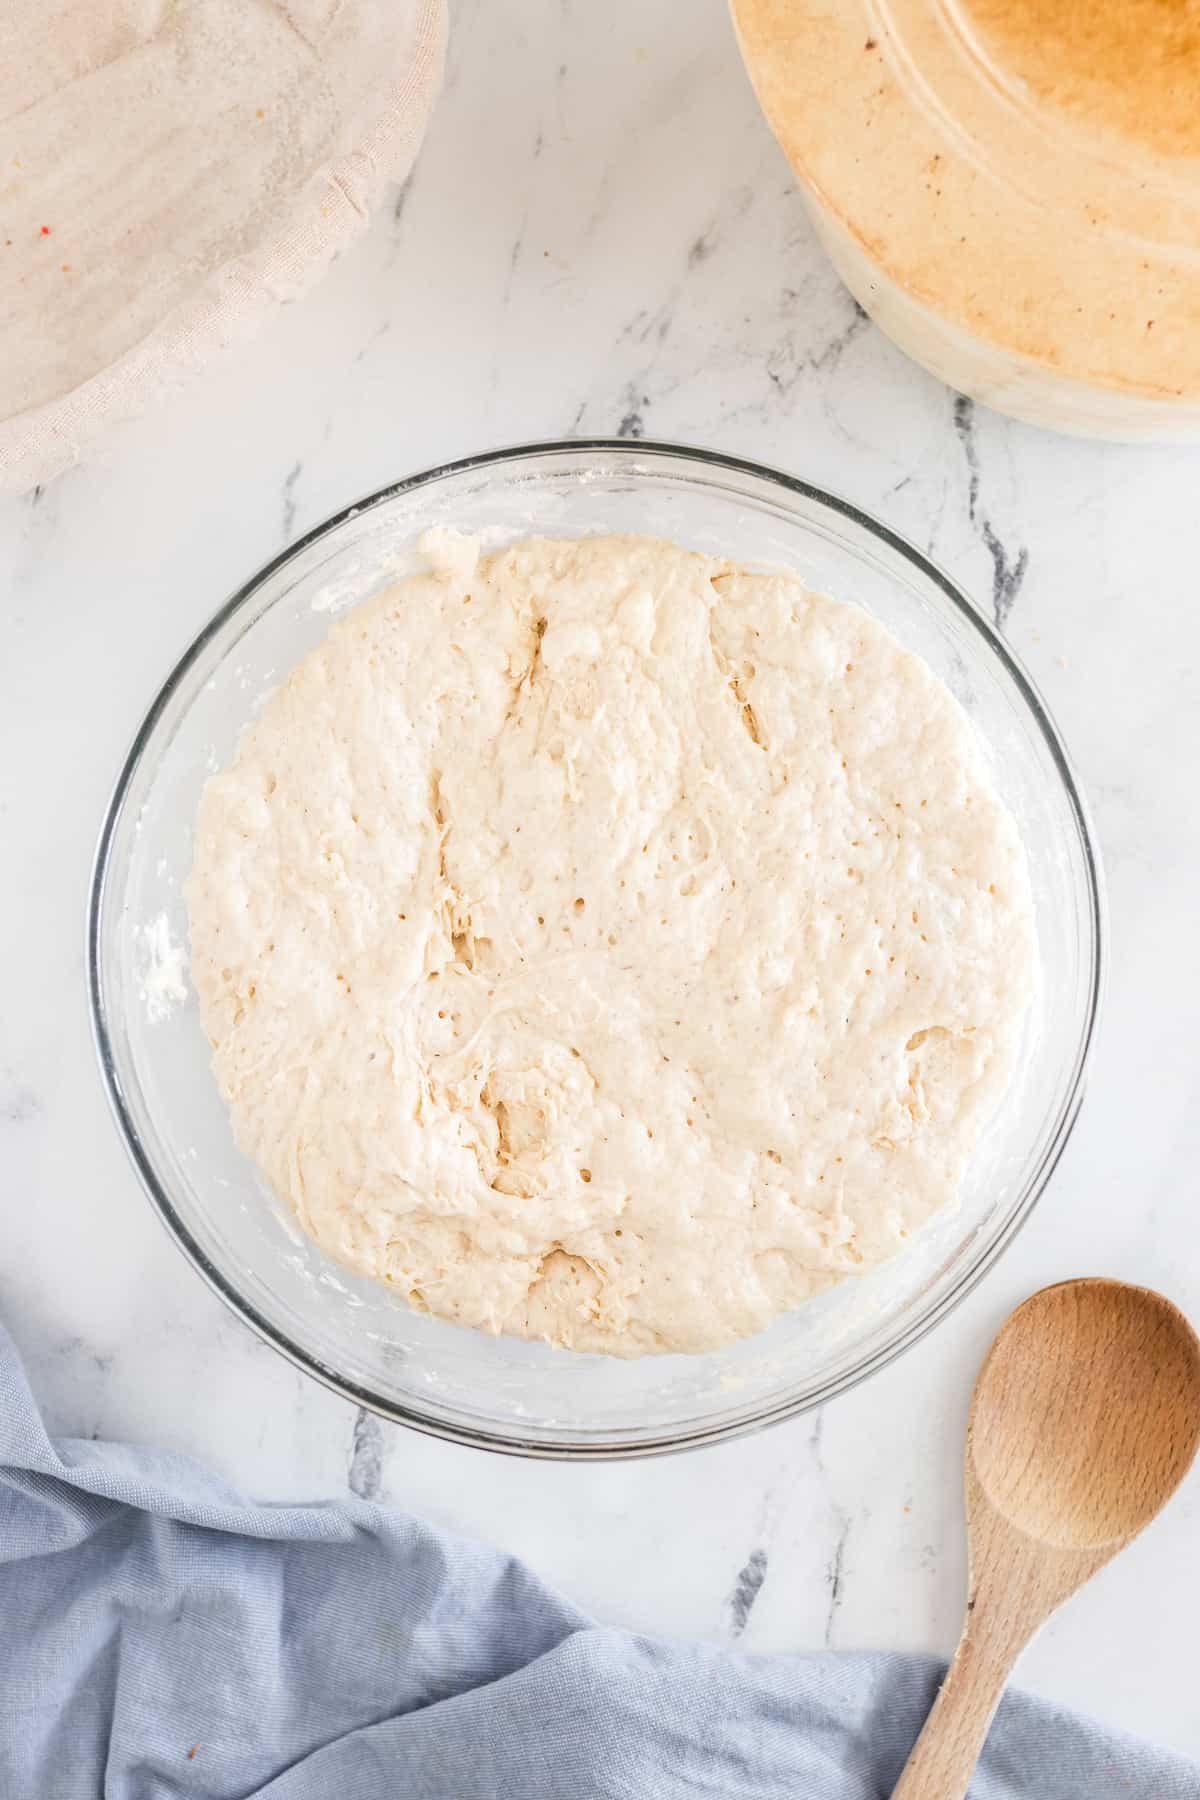
- Step 3:The dough is ready when it looks noticeably lighter and aerated but has not doubled. If it begins to sink in the center, move on to shaping.
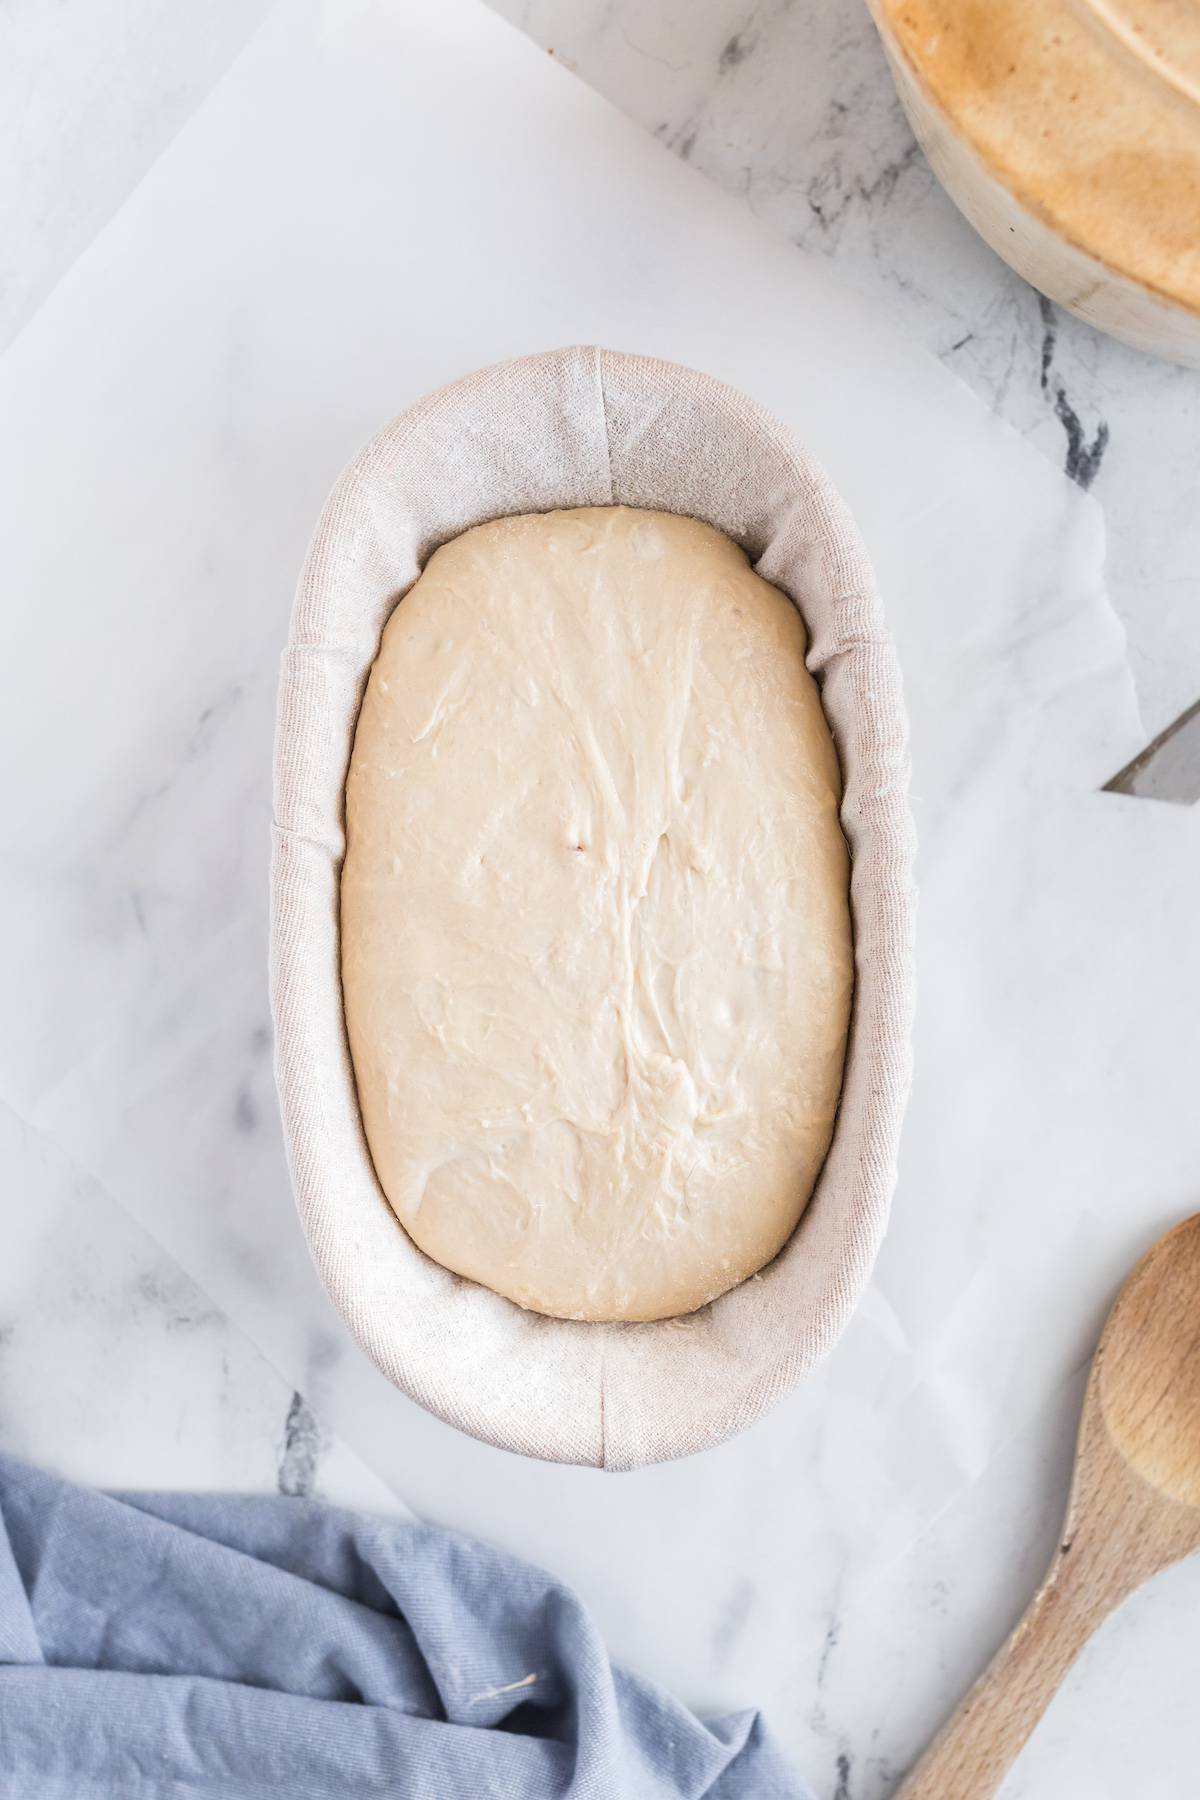
- Step 4: Gently shape the dough into a round and place seam-side up in a well-floured banneton or towel-lined bowl. Cover tightly and refrigerate for 12-16 hours.
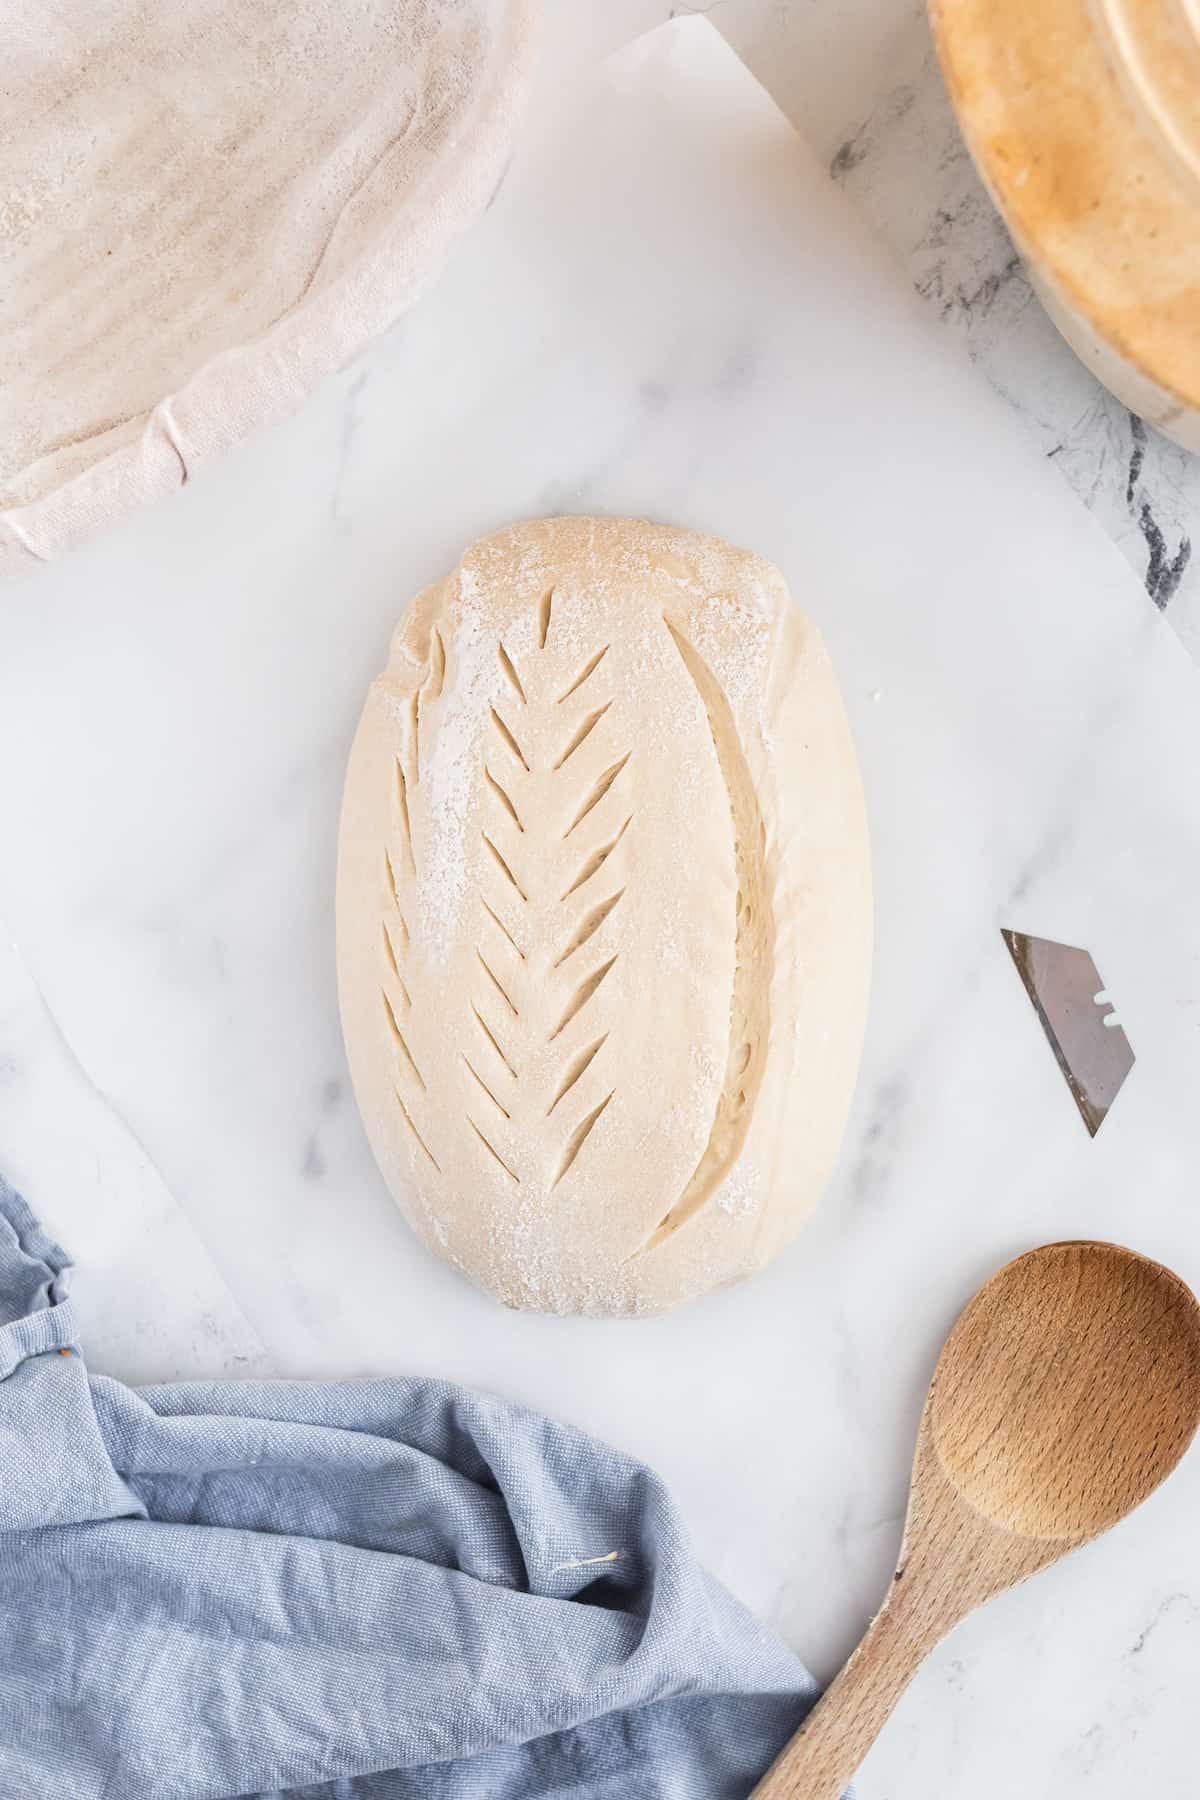
- Step 5: Turn the chilled dough onto floured parchment, seam-side down. Lightly dust with flour and score the top about ¾-1 inch deep.
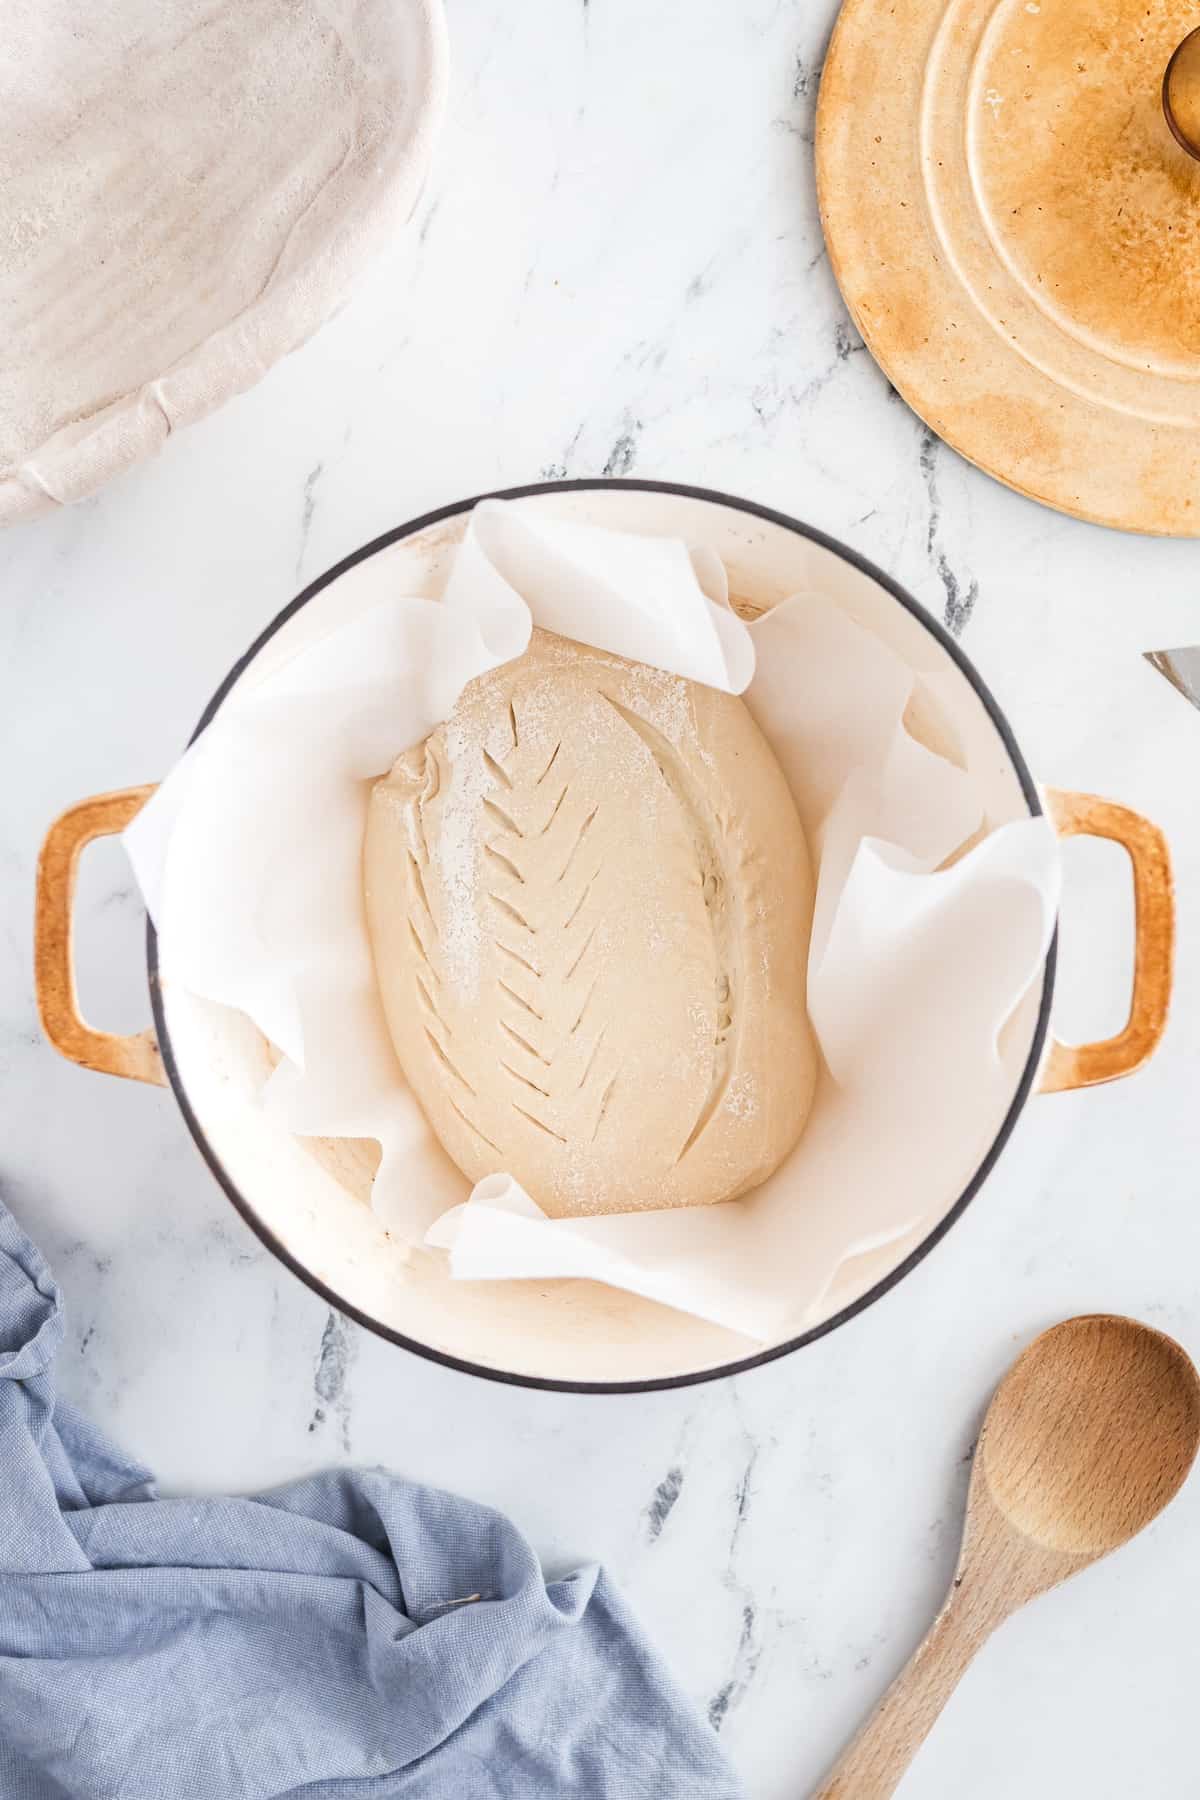
- Step 6: Transfer the dough to a preheated Dutch oven, cover, and bake. Remove the lid partway through baking to allow the crust to fully brown.
This is a quick visual guide to the process. For complete ingredients, measurements, and step-by-step instructions, scroll to the recipe card below.
Recipe Notes & Tips:
- Flour Blend: Use a gluten-free 1:1 flour blend that already contains xanthan gum. This recipe was tested with blends like Bob's Red Mill 1:1 and King Arthur Measure for Measure. If your blend does not include xanthan gum, add psyllium husk as directed to ensure proper structure.
- Starter State: This recipe uses unfed gluten-free sourdough starter to slow fermentation and improve consistency. The starter should be bubbly, have reached its peak, and just begun to fall before using. Freshly fed starter can cause the dough to rise too quickly and collapse.
- Water Temperature: Always use room-temperature water. Warm water accelerates fermentation and increases the risk of over-proofing, especially in gluten-free dough.
- Bulk Fermentation Target: Gluten-free sourdough should rise by about 50 to 75 percent during the first rise. Allowing the dough to double can lead to collapse and a dense or gummy texture.
- No Stretch and Folds: Stretching and folding are not necessary for gluten-free sourdough. Thorough mixing at the beginning provides better and more consistent results.
- Cold Proof: Refrigerating the dough for 12 to 16 hours is essential. This step slows fermentation, improves structure, and enhances flavor while preventing over-proofing.
Save this Recipe
How to Store:
Airtight Container: Transfer the cooled bread into an airtight container or wrap it tightly in plastic wrap to keep it fresh.
Room Temperature: Store at room temperature for up to 2 days if you plan to consume it quickly.
Refrigeration:For longer storage, keep the bread in the fridge for up to a week; just be aware that refrigeration might slightly affect the texture.
Freezing: For extended storage, wrap the cooled bread in plastic wrap, then in aluminum foil, and freeze for up to 3 months. Thaw at room temperature or warm it in the oven before serving.
Gluten-Free Sourdough Bread FAQs:
Gluten-free sourdough bread is most often gummy when it is underbaked, over-proofed, or sliced too soon. Because gluten-free dough retains more moisture than wheat dough, it needs a longer bake and a full cooling period to set properly. For best results, bake until the internal temperature reaches at least 210°F and allow the loaf to cool completely for at least 2 hours before slicing. Cutting the bread while it is still warm traps steam inside and can create a gummy texture.
If gluten-free sourdough bread does not rise, the most common causes are inactive starter, cold fermentation temperatures, or moving on before fermentation is complete. This recipe uses unfed starter, which ferments more slowly, so the dough should look puffy and airy and increase by about 50-75% before shaping. If the dough looks dense or flat, allow it more time at room temperature before refrigerating.
Yes, gluten-free sourdough bread can be made with different gluten-free 1:1 flour blends, but results may vary. For best structure, the blend should already contain xanthan gum. If your flour blend does not include xanthan gum, adding psyllium husk is necessary to help the dough hold its shape. Because different blends absorb water differently, you may need to adjust the water by 10-20 grams to achieve a thick, sticky dough.
Gluten-free sourdough bread should cold proof in the refrigerator for 12-16 hours. This slow fermentation helps prevent over-proofing, improves structure, and develops better flavor. Shorter cold proofs can lead to a dense loaf, while much longer cold proofs may cause the dough to weaken and collapse.
Grab your free copy
Get a FREE Healthy Meal Planning Ebook
Tips, Tricks, and Recipes for Stress Free Meal Planning
Gluten-Free Sourdough Bread
Ingredients
- 500 grams gluten-free flour, 1:1 blend with xanthan gum
- 340 grams room temperature water
- 200 grams unfed gluten-free sourdough starter
- 12 grams finely ground sea salt
Instructions
- In a large bowl or the bowl of a stand mixer, add the gluten-free flour, salt, unfed sourdough starter, and room-temperature water. Mix until fully combined and no dry flour remains. The dough will be thick, sticky, and closer to a batter than traditional bread dough. Scrape down the sides of the bowl, lightly smooth the surface of the dough, and cover.
- Let the dough rise at room temperature in a draft-free spot for 6 to 9 hours, depending on the temperature of your kitchen. The dough is ready when it looks puffy and slightly domed, has small bubbles visible beneath the surface, and has increased in size by about 50 to 75 percent. Do not allow the dough to double, as gluten-free dough can collapse if over-proofed. If the dough begins to sink in the center, move on to the next step immediately.
- Lightly flour your hands and gently turn the dough out onto a floured surface. Shape the dough into a round by carefully tucking the edges underneath. The dough should feel light and airy while still holding its shape. Transfer the dough seam-side up into a well-floured banneton basket or a bowl lined with a floured kitchen towel. Cover tightly.
- Place the covered dough in the refrigerator and let it cold proof for 12 to 16 hours. This slow, cold rise helps control fermentation, improve structure, and develop flavor. Do not skip this step, as it is essential for consistent gluten-free sourdough results.
- Place a Dutch oven with the lid on into the oven and preheat to 500°F for at least 30 minutes so it is fully heated before baking. Remove the dough from the refrigerator and turn it out onto a piece of lightly floured parchment paper so it is seam-side down. Generously dust the surface with flour, then use a sharp knife or bread lame to score the dough about three-quarters to one inch deep.
- Carefully remove the hot Dutch oven from the oven. Using the parchment paper, lift the dough and place it into the Dutch oven. Cover with the lid, return it to the oven, and immediately reduce the oven temperature to 450°F. Bake covered for 40 minutes.Remove the lid, reduce the oven temperature to 425°F, and continue baking for 30 to 35 minutes, until the crust is deeply golden and the loaf sounds hollow when tapped on the bottom. Remove the bread from the Dutch oven and transfer it to a wire rack. Let the bread cool completely for at least 2 hours before slicing. Cutting too early can result in a gummy texture.
Nutrition
Notes
- Flour Blend: Use a gluten-free 1:1 flour blend that already contains xanthan gum. This recipe was tested with blends like Bob's Red Mill 1:1 and King Arthur Measure for Measure. If your blend does not include xanthan gum, add psyllium husk as directed to ensure proper structure.
- Starter State: This recipe uses unfed gluten-free sourdough starter to slow fermentation and improve consistency. The starter should be bubbly, have reached its peak, and just begun to fall before using. Freshly fed starter can cause the dough to rise too quickly and collapse.
- Water Temperature: Always use room-temperature water. Warm water accelerates fermentation and increases the risk of over-proofing, especially in gluten-free dough.
- Bulk Fermentation Target: Gluten-free sourdough should rise by about 50 to 75 percent during the first rise. Allowing the dough to double can lead to collapse and a dense or gummy texture.
- No Stretch and Folds: Stretching and folding are not necessary for gluten-free sourdough. Thorough mixing at the beginning provides better and more consistent results.
- Cold Proof: Refrigerating the dough for 12 to 16 hours is essential. This step slows fermentation, improves structure, and enhances flavor while preventing over-proofing.

Heather West says
When you cover to do the first proof is it with plastic wrap or towel? Second cold proof do you leave in the basket? What type of cover for the cold proof in the fridge? Thanks!
kathy says
I'm looking for a starter recipe to go with this bread and couldn't find it.
Kaeleigh Pugliese says
this is the recipe I use
https://www.farmhouseonboone.com/gluten-free-sourdough-starter/
PJ says
My dough was definitely NOT sticky, light, or airy. It was more like a concrete block. It didn't rise well and was not malleable for shaping. I baked anyhow and there are cracks all over the crust (yes, I did a cut with a lame). The cracks look like they're from being super dry. The starter I used was lovely (also made with KA 1:1) but I think the water measurement is off for me. Can I simply add more water to the dough in the mixing process next time?
Kaeleigh Pugliese says
Yes, I would try a tablespoon at a time until the dough doesn't feel dry and does feel sticky.
Alexis says
I had this same issue. Gonna add more water next time
B says
My dough had a similar fate, and resembled cookie dough consistency rather than a batter as mentioned in the recipe. I too think it needed more water. Working on loaf #2 with more water to see if the results are different.
M says
It was perfect! Will make again!
Abby says
This was the very first recipe I used when I started making gf sourdough, and the fact that the first loaf made was edible was a huge win for me (baby steps, right?). After recipe hopping I’ve come back here, and the dough is looking so much better after the initial rise! It’s grown in size and has some bubbles (as compared to first attempt, which mirrored play dough). When I turned it out onto a floured surface to prepare it for the cold proof, the part of the dough that was at the bottom of the bowl (which after being flipped out, became the top of my loaf) looked too airy almost like the mixture had separated? Kinda like a the top of a chocolate crinkle cookie? It’s currently in the fridge for the cold proof but curious what this means. Thanks!
Kaeleigh Pugliese says
That airy, slightly cracked surface is normal for gluten-free sourdough and is actually a sign that fermentation is working. Gas tends to collect at the bottom of the dough, so when it’s flipped out it can look bubbly or crinkle-like, moving it to the fridge at that point was exactly the right call!